A while back I started playing with the Pwnagotchi which is basically an automated wi-fi handshake capture tool which can be configured to automatically upload captured handshakes to various online cracking tools. It’s powered by an AI that learns to capture wi-fi handshakes better over time, and can learn to cooperate with other pwnagotchi units to more efficiently capture wi-fi handshakes.
The good: for pentesting this thing is awesome. It’s an automated way to collect pcap files for possible decrypting that is about the size of a large pack of gum.
The bad: if you have a weak WPA password, it makes a usually technically complicated task into a trivial task for someone to own your wi-fi, and they can be built for as little as $10.
I did this project on hard mode, working from a Windows 10 computer and an iPhone, and I want to share some of my notes.
The Build
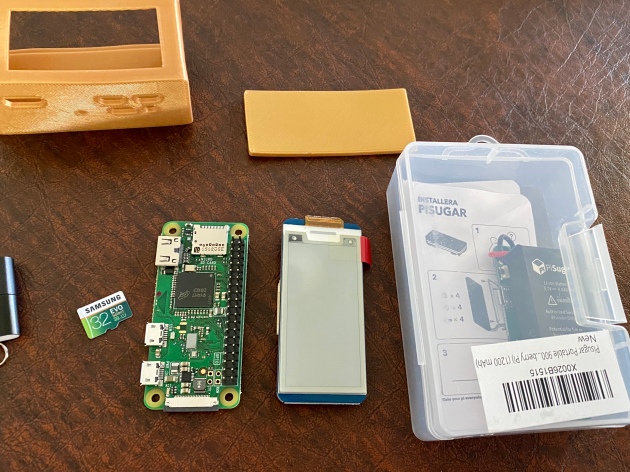
There are a number of different ways that the Pwnagotchi can be built. For this project I chose the Raspberry Pi Zero w (pi0w), Waveshare v2 eInk display, and PiSugar 1200mAh battery hat (the featured pic for this post is my actual components just prior to the build). This is a common configuration and I chose it primarily because I wanted to see how easy this was to set up following the documentation from the project (which needs work).
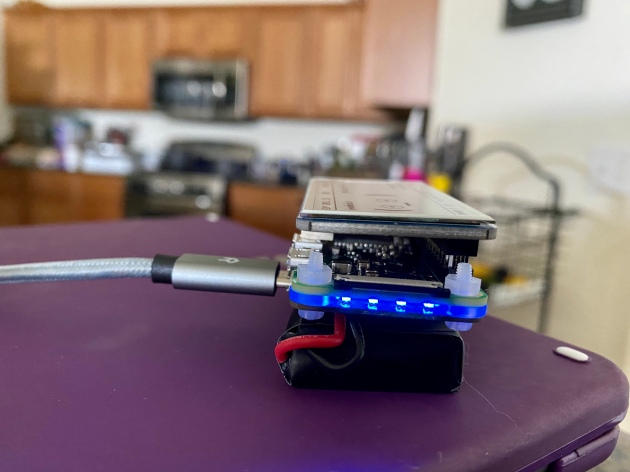
The four blue LEDs you see in this pic are the PiSugar’s battery indicator. In my testing I’m getting about 4.5 hours of run time on the 1200mAh PiSugar, so each one of those lights is roughly equivalent to an hour of runtime.
Because the PiSugar is connected via spring pins, this means that you can’t easily turn off the Pwnagotchi, unless you do some digging because the PiSugar has nothing with a capital nothing in the way of documentation. There is a physical button that allows you to reboot, power or, or power off the pi0w when the PiSugar is attached. It’s tiny, and you will probably miss it.
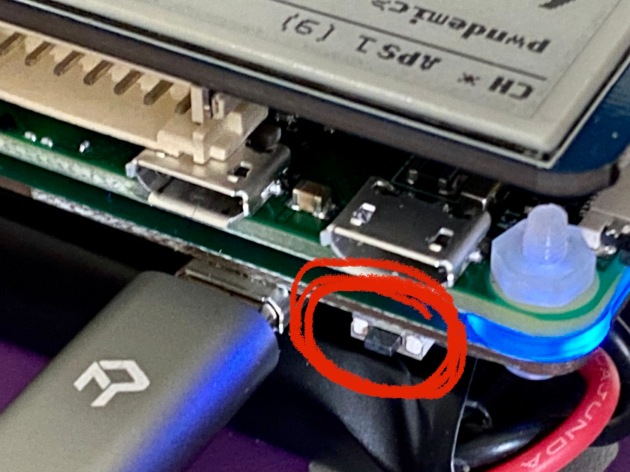
That is the button. Press it once to turn on the pi0w, again while running to hard reboot the pi0w, and double click it to hard power off the pi0w. Unfortunately the PiSugar1 does not support I2C communication so there is no way to monitor the battery life from the pi0w (unlike the USB-Lite battery hat). This means that when you use the button on the PiSugar it’s a hard reset or hard shutdown, which can lead to issues with file or even sdcard corruption. The best solution is to use the Pwnagotchi’s web interface to power down the unit (or do it via commandline) and then use the PiSugar’s button to start it back up.
Because the initial boot of the Pwnagotchi involves a one time generation of an RSA key, I turned the battery off before inserting the sdcard and powered the unit via the power port (the USB port on the right in the pic above) for initial boot. This process can take a half an hour or more once the boot process is complete, but with a good sdcard can be considerably faster.
Notes:
- As with all Pi projects, SDCards matter. Better is better. The sdcard is the heart of your project and its quality and speed will have major impact on your experience. The cheap noname 16GB card I had in my box of parts took more than 30 minutes to boot when I tested it with the pi0w.
- Make sure when connecting the pi0w to a computer that 1) your USB cable supports data, and 2) that you select the actual data port, not the power port (in the picture above that is the port above the button, you want the one on the left).
- eInk displays come in wide variety. The Waveshare was relatively inexpensive at $22 on Amazon, and there are many 3D printed case designs available for different configurations.
- The battery hat was probably my most contentious part selection. I went with the PiSugar only because it was readily available. The UPS-Lite battery hat has built in support for displaying the battery level on the display of the Pwnagotchi. If I were doing this again I’d probably go that route.
- The pi0w does not have a real time clock, so if I make changes to this in the future, it will likely be to add that. There are plenty of tutorials online, and it’ll fit between the display and the pi0w neatly.
Configuration
Setting up the config.toml file is fairly straightforward, the project docs are pretty easy to follow for that. If you’re doing this on a Windows machine just know that the config.toml file needs to go in the root of the sdcard, not the /root folder.
This is where the project docs start to fall down. To be fair, there are a lot of possible scenarios so it’s a hard thing to get right for everybody, and I’d be comfortable saying that it is likely that the majority of people attempting this project are doing so from a Linux background. I am fairly comfortable with Linux, but I generally work on Windows machines.
The first issue I ran into was on initial boot. My SSH attempt was being rejected. This is because the IP you assign is for the adapter of the RNDIS gadget in windows, not the actual pi0w. My network at home is 10.0.0.x/24, and it looks like the Pwnagotchi build is set up to expect this. Both a blessing and a curse, because if you have a device on your network that is using 10.0.0.2 you’re gonna have fun trying to SSH to the Pwnagotchi and have network connection at the same time.
I luckily didn’t, and once I realized the mistake I was making I was able to establish a connection to the pi0w at 10.0.0.2. I then realized that because my actual gateway is 10.0.0.1, and I had assigned something else to my RNDIS adapter, I could communicate with the Pwnagotchi, but it could not communicate with the outside world. Initially I thought “well, I’ll just set up the wi-fi on the pi0w and connect that way,” but because of the nature of the project, the wi-fi on the pi0w is not usable (bettercap is using it to sniff wi-fi handshakes, duh).
My solution was to connect the Pwnagotchi to my iPhone via bluetooth and share the internet from there. It’s not as easy as that sounds. Luckily with Pwnagotchi release 1.5 they’ve dropped the YAML config file for a TOML config file (which is a lot easier to get right), but there also isn’t much in the community forums about the config.toml file and how to set it up (almost everything I found was referencing config.yml). I was eventually able to get it working, here is the section I had to add to the config.toml file to get it working:
main.plugins.bt-tether.enabled = true
main.plugins.bt-tether.devices.ios-phone.enabled = true
main.plugins.bt-tether.devices.ios-phone.search_order = 1
main.plugins.bt-tether.devices.ios-iphone.mac = "xx:xx:xx:xx:xx:xx"
main.plugins.bt-tether.devices.ios-iphone.ip = "172.20.10.6"
main.plugins.bt-tether.devices.ios-iphone.netmask = 14
main.plugins.bt-tether.devices.ios-iphone.interval = 1
main.plugins.bt-tether.devices.ios-iphone.scantime = 15
main.plugins.bt-tether.devices.ios-iphone.max_tries = 10
main.plugins.bt-tether.devices.ios-iphone.share_internet = true
main.plugins.bt-tether.devices.ios-iphone.priority = 1
The actual connection took a while. You have to enable your wi-fi hotspot in iOS, and then wait for a connection attempt in the bluetooth settings. It takes a few minutes, but it’ll eventually happen. Once you allow pairing, you just have to follow that process and attempt to connect the bluetooth device in iOS when the Pwnagotchi status is “Looking around” or at least that seems to work for me.
Once it’s connected, it’s time to update the OS with a standard
sudo apt-get update && sudo apt-get upgrade
command. Because we are using a battery, we’ll need to power that off before connecting the data port so that the pi0w is running off of the USB port power rather than the battery. The pi0w is a tiny single board computer and updates can take a long time. Losing power during an update is a good way to corrupt your disk.
Once the OS update is complete, reboot and then enable the webcfg plugin via the web interface so that you can finish configuration there. It’s a lot easier than trying to do it via commandline.
Notes:
- The Pwnagotchi will initially come up with the IP 10.0.0.2, when you assign an IP to the RNDIS adapter, your assigning that IP on the local computer. This is the gateway for the Pwnagotchi, so if you don’t assign 10.0.0.1 to the RNDIS adapter you will have no internet connection. In my case, I couldn’t because 10.0.0.1 is my actual gateway.
- main.plugins.bt-tether.devices.ios-iphone.mac = “xx:xx:xx:xx:xx:xx” is the bluetooth MAC of your iPhone, just replace the xx bit with your actual MAC.
- Make sure once you’re done with configuration and updating that you backup your sdcard using dd or Win32DiskImager so that if your sdcard dies you can make another that is ready to run as soon as it is powered up.
Conclusion
This was a really fun project that is a neat way to learn about AI and Deep Reinforced Learning while having fun and (for me at least) reliving some of the excitement of a good old fashioned wardriving session.


