How do I Change the product key in Windows 8?

Official mascot of Windows 8

I’ll just get it out of the way right up front: I hate the Windows 8 UI.

It might make sense on a consumer device, but not for an enterprise. There is no way I’m deploying this to my users. It’ll be two months of help desk tickets that look like this: I can’t find my email. I can find the internet. What’s a Metro?

Not happening. Why Microsoft thought it would be a good idea to throw away 20 years of training their users how to use their flagship product, I’ll never know. I just hope whoever is responsible is dealt with appropriately. By ‘appropriately’ I mean taken out back and shot.

When someone who has been administering Windows machines since Windows 98 is sitting there asking how to actually install Windows Updates, your UI has gone terribly awry.

In order to actually install updates, you have to activate the OS. Apparently to really do anything you have to activate the OS. Ok, I can see that. We use Windows 7 Enterprise here, and I was kinda hoping that Microsoft had realized by now that it is a terrible idea to force the Windows 8 UI on enterprise customers, and had disabled it in Windows 8 Enterprise. No such luck.

Also, they expect enterprise customers will be using KMS servers to activate. We do not. Why? Well I can’t get it working correctly. Microsoft says that it is working. It says that it is working. Clients cannot activate using it. I have a ticket open with Microsoft.

In the meantime, I will just use MAK keys. Except I can’t find a way to get the damn MAK key into Windows 8 Enterprise. Just because I’m not forcing it on giving it to users doesn’t mean I’m not evaluating it.

Apparently they expect you to use KMS to activate MAK keys by opening an elevated command prompt, and typing this command:

slmgr.vbs -ipk “Enter Key Here”

Well that’s all well and good, but I don’t need more KMS “servers” that don’t serve keys.

The easy way is to use a Run Command:

slui 3

That was added to Windows 7 at some point, and works as well there as it does on Windows 8.

I hope that saves someone the time it took me to figure it out.

Assigning an IP Address to an APC Network Management Card without having the APC software.

I work for a company that does Electrical construction and design. When I took this job I though that would translate into having little things like plenty of power in the server room, well documented wiring, and maybe having everything in the building(s) on UPS units. I should have known better.

Much like most IT Professionals home networks are kinda messy, working for a company full of electricians translates to wiring… issues.

We do have a generator, and we do have a building UPS in the main building. That UPS is 15 years old. The UPS battery had never been replaced when I got here (it basically had a runtime measured in microseconds). Only some outlets are on the UPS circuits. The server room is in another building. That building is on the generator, but there is only one circuit that is on the UPS. That circuit was for the 17 year old Toshiba PBX that was mounted (I kid you not) in a cupboard in the bathroom in that building.

The servers were on UPS units. APC SmartUPS 1500 units. Four of them. That were 6 years old. With batteries that had never been replaced. Desk units that were housed on shelves in the rack. That were at approximately 150% of draw capacity (when all servers were at peak draw). Unconnected in any way to any of the servers.

This meant that if the power failed (which is does, because this is an older part of town), most of the workstations would go down, and the generator would kick on. Approximately 1/1000000000 of a second before the UPS batteries on the servers and the few workstations on building UPS circuits ran out. Most of the time.

So clearly my first priority was to get the servers on a UPS that was correctly sized for the draw, with fresh batteries. Enter the APC SmartUPS RT 5000 with two battery arrays. This unit will handle all of our current servers, with about 30% extra capacity for expansion. I bought this unit with a Network Management Card so that I could remotely monitor the unit. And then never configured it. I’m not going to make excuses, it was just one of those things where I got busy and forgot.

Until I needed to get access to a UPS in the other building. This got me thinking about the UPS on the servers. So I plugged the NMC into one of the switches, and… nothing.

As it turns out, the NMC in this particular unit will not pull a DHCP lease without intervention through some APC software that ships with the unit. Which I cannot find. Not an insurmountable issue.

Enter the ARP command.

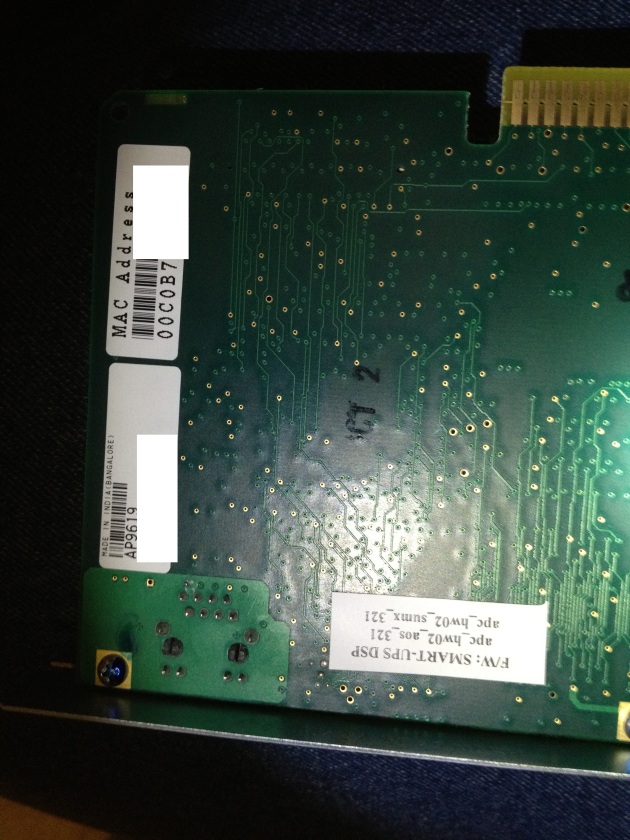
Address resolution protocol (ARP) can be used to configure the NMC. All we need is the MAC address of the NMC.  The MAC address is located on the quality assurance slip that shipped with the NMC, and is also located on a white sticker on the NMC itself.Unfortunately the QA slip is long gone, and the sticker on the NMC with the MAC printed on it is on once of the actual circuit boards of the NMC, now safely concealed inside the UPS.

Now I DO NOT recommend that you do this, but it is possible to remove the NMC with the UP running. If you feel like taking your life in your own hands, you could just unscrew the NMC and pull it out of the UPS without taking the UPS offline. Which is what I did.

Now we just need a computer on the same subnet.

Open up a command prompt and type the following (MAC Address format: xx-xx-xx-xx-xx-xx):

arp -s [IP_ADDRESS_FOR_THE_NMC] [MAC_ADDRESS_OF_THE_NMC]

Hit Enter.

Next, use Ping with a size of 113 bytes to assign the IP address defined by the ARP command.

Use one of the following Ping commands (To clarify, the -l option is the letter L but must be lowercase when executing the command):

Windows command format: ping [IP_ADDRESS_ASSIGNED_ABOVE] -l 113

*NIX command format: ping [IP_ADDRESS_ASSIGNED_ABOVE] -s 113

Now, you can Telnet to the card by typing: telnet [IP_ADDRESS_OF_THE_NMC]

Use “apc” for username and password.

Configure/apply any additional changes.

Log out to save changes.

That’s it, now you can use the web interface of the NMC to make configuration changes or retrieve information from the UPS unit.

All of this could have been avoided had I simply taken 30 minutes to configure the UPS when I installed it, or even taken 5 minutes to document the MAC and put all of the paperwork that came with the UPS in a folder in my file cabinet. Learn from my mistakes, DOCUMENT EVERYTHING.


Setting up DFS on Windows Server 2008 R2 in a domain with Windows 2003 Server DC’s: Fixing a very particular DFS Replication error

So I’m in the process of a complete migration to Server 2008 R2, and it comes time to migrate DFS. No problem. I have it working on the 2003 machines, I’ll just leave those up to service the users while I set up a new Namespace on the 2008 R2 DC’s, and then I’ll remap the user drives.

Well that was the plan anyway. As it turns out, it’s not quite that easy.

Before I get started on the particular issue I encountered I’ll note that if your DC’s are all 2003 (Schema v30), and you have not updated the AD Schema in preparation for 2008 R2 DC’s (Schema v47), you will want to do that now. The DFS-R service requires that the AD Schema be updated to at least 2003 R2 (Schema v37), and you’re going to have to update it to 2008 R2 before you can add a 2008 R2 Domain Controller anyway so might as well do it now (see this for more information).

The problem: Replication

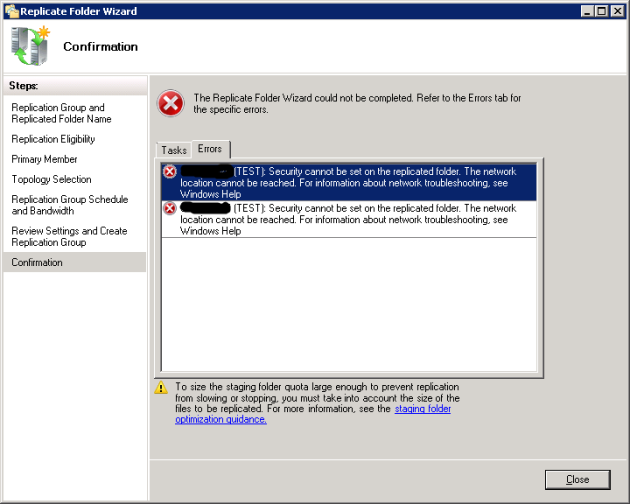
I set up the Namespace Folders in the DFS Management Console first, and then proceeded to add the Folder Targets. Once you add a second Target to a Namespace Folder, the DFS Management console prompts you to set up replication, which I did. I ran through the Replication Wizard, accepting all the defaults, and it promptly failed out at the “Update folder security” step, as shown in Figure 1:

Figure 1

Ok, well there is a tab for the error, let’s click that and see what’s in there as shown in Figure 2 (the blacked out areas are the Server names):

Figure 2

Well, that’s not very helpful. Maybe there is something in the event logs? Hmm not really, the closest thing was an Error 6804 from DFSR as shown in Figure 3:

Figure 3

Which is not exactly helpful. So what is the problem? Well it turns out that Microsoft doesn’t document very well. They document in exact steps using an example (like this one on how to set up DFS on Server 2008). The problems arise when you deviate from that example in an attempt to do things in a logical manner. I inadvertently caused this issue, in the underlying file structure on the Servers.

I have two identical (hardware wise) servers that I am configuring this on. They each have a single RAID10 volume totaling approximately 680GB of storage per machine. This is in two partitions; the SYSTEM partition (C:\) at ~50GB, and the DATA partition (D:\) at ~630GB, give or take a couple of GB’s.

When I set up the DFS Namespace, I decided to keep everything simple: since the SYSTEM partition is rather limited, I’ll set the DFSRoot in D:\public, which also happens to be where I created the Folder Targets. This is a no no. When you create a Folder in DFS, Microsoft creates a reparse point in the DFSRoot with the same name. Well, it turns out that there is absolutely nothing that will prevent you from selecting and sharing this reparse point as a Folder Target in DFS. Well nothing except trying to get the Folder Targets to replicate. There is also nothing in any of Microsoft’s technical documentation that says that this is a no no.

At this point, I deleted the entire DFS Namespace, and started over (keeping this in mind). It works fine when you separate the DFSRoot and the Target Folders.

I guess all I can say is; I… I didn’t know I couldn’t do that.

How to make use of your PowerShell profile.

PowerShell is the tool for Windows Administrators. I can’t even begin to explain how truly useful it is in this article. Once of the most awesome features of PowerShell is it’s native extensibility. It is rather trivial to do things in PowerShell that would take monumental amounts of effort using any other Windows automation technology (I’m looking at you VBScript), if it is even possible to do them with said technology (again, I’m looking at you VBScript).

Before you can make use of a profile in PowerShell, you must enable the execution of scripts (this is disabled in PowerShell by default), by setting the Execution Policy to at least “AllSigned” (be aware that if you do this, you’ll have to be able to digitally sign your scripts before any will execute, including your profile script). You can find information on setting the PowerShell Execution Policy here.Once you have the Execution Policy set (I generally use RemoteSigned, but in a production environment, you should really be using AllSigned for maximum security), you need to set up your profile script.

PowerShell can store all kinds of useful things in the $profile variable (like aliases, functions, variables, or even extensions like snap-ins or modules), which is actually a PowerShell script that is executed when a console session is started (hence why you need to set the Execution Policy before you can make use of it). But the PowerShell Profile is not created automatically. To see if you have a PowerShell profile, open a PowerShell session, and type this command:

    test-path $profile

If it returned $true, you already have a PowerShell profile set up, if it returned $false, you do not (If you do skip to the “Editing your $profile” section below).

Creating a PowerShell Profile

If you do not already have a PowerShell Profile the first step is to create one. This can be easily done right from the PowerShell console. To create a profile script, type the following at the PowerShell console prompt:

    new-item -path $profile -itemtype file -force

This will generate the required file, and let PowerShell know that you are ready to use it.

Editing your $profile

Just having a PowerShell profile does nothing to change the way PowerShell behaves. To really make use of a PowerShell profile, you’ll need to add something to alter PowerShell’s default behavior. To edit the PowerShell profile type the following command at the PowerShell console:

    notepad $profile

This will open your $profile script for editing in NotePad. Ok, so now what do we put in there?

Really this is going to be personal preference. There are literally thousands of things you can put in a PowerShell profile script. For purposes of demonstration, we’ll set an alias. In the NotePad window that opened when we ran that last command, add this line:

    Set-Alias open 'explorer'

This creates an alias for Windows Explorer. Now save the file, and run this command at the PowerShell console:

    . $profile

This will reload your profile script (make sure there is a space between the “.” and “$profile”), and we can now make use of the alias. At the PowerShell console type the following:

    open c:\

If your $profile is working correctly, this should have opened the root of your C:\ drive in Windows Explorer. Now you can do the same thing without the $profile script directly in the console, but using the PowerShell Profile allows things you set there to persist between console sessions (you can test this by closing the PowerShell console and reopening it, the alias we just set should still work).

Kung Fu for SysAdmins: Using Version Control Systems for scripts

Like nearly every administrator I know, I have a few scripts that I use to help me do my job easier and faster. Well ok, more than a few. Alright, alright, I have more scripts than most people have hair.

I have scripts that were written for an NT4 Alpha Cluster. I never get rid of them. I’ve lost more scripts than most people will ever have. I’ve forgotten more about most scripting languages than most people will ever know.

I find that the challenge is keeping track of them. If I could turn my computers, network storage, USB drives, and email upside down and shake them, enough scripts would fall out to fill the library of congress. Damned if I know where they’re all stored, but I know I have them.

Unfortunately, most of them are variants on the same script, or actually are the same script. Many times if I can’t find the exact script I am looking for, I’ll slap one together, do some quick testing, give it a unique name (you know something that makes it easy to know what it does, like “test74.vbs”), use it once or twice, and then forget what it was for.

Yes I’ll admit it, I have a problem. If there were an AA for scripters, I’d probably be the president of the local chapter.

Or at least I would have been before I started using Version Control software. About a month ago I was editing a script that I was having troubles with, accidentally overwrote something that broke it, and closed the editor. Not a big deal on small scripts, but this one was at about 1500 lines. It took me HOURS to figure out exactly where the code was that I’d overwritten, but I never did figure out exactly what I did that broke it (though I did get it working well enough to do what I needed it to do).

I’ve known about Version Control software for years (I worked at a software company once upon a time), I’ve even used Subversion before. I’d been meaning to set it up for myself for years, and this incident was the catalyst I needed to actually do it.

Keeping the LAOAE principle in mind, I wanted my repository to be available to me in all the places that I’d be likely to be working on a script, mostly at work and at home.

But I already have enough servers to admin, and I don’t really want to have to care for and update yet another thing on my work network, so I started looking for hosted subversion offerings. I’m not a software company, so I had to weed out the ones that wanted absurd monthly fees (and offered absurd feature sets). I just wanted hosted Subversion, I didn’t need team collaboration, or project management features. I thought about going Open Source with it (like github, or Google code) but decided that since I would be using it to also host code that belongs to my employer, it would probably be better to go with a commercial solution.

Did I mention that I didn’t really want to spend any money on this? Yeah, free is king in the land of the Sysadmin. There were several services that fit the bill, in the end I decided to use ProjectLocker. Their free offering gives you three users and 300MB of storage (even for my bloated script collection this is plenty) three Repositories, and three Projects (each project can have an unlimited number of files and folders), though for only $19/month you can move up to 15 users and 10GB of storage (full details of their offerings can be found here).

Oh and all of their plans offer both Git and Subversion, so whichever you are more comfortable with is available. I have used subversion in the past, so that’s what I chose to go with.

Now before I get any further in this post, I am going to write this with the assumption that you have at least a conceptual knowledge of how Version Control Systems (VCS) work. If you don’t and would like to, this free ebook is a great place to start (and really relevant, as it’s also the official documentation for Subversion).

Setting up a VCS for use with scripts

ProjectLocker (Subversion)

Initial setup of a ProjectLocker account is quick and easy:

  1. Select your Service Level (Free is fine for me).
  2. Select you term (Free is Always Free).
  3. Enter a promotional code (optional).
  4. Enter a Referral Source email address (if you have one, the referrer gets free storage space in small increments).
  5. Click “Next Step”.
  6. Agree to the Terms of Service (if you do), and select the “I am ready to setup my account” button.
  7. The information on this page is pretty self explanatory, click the “Place My Order” button at the bottom when done

Save the Login URL on the resulting page! This is the URL you will use to access your repository (https://portal.projectlocker.com).

Log in to your repository and fill out the requested information (it helps keep the free offering available).

That’s pretty much it on the Subversion side, though you can set up users and additional projects if you like. Since I am using this to host my personal code, as well as code that belongs to my employer, I set up two projects: Personal_code and Work_code (I know, original right?).

Once you have a repository running, ProjectLocker will give you a URL to the repository, it’ll look something like this: https://pl3.projectlocker.com/TestCompany77/Personal_code/svn

This is what you’ll need to access the repository from a client, so write this down (bookmark it, whatever you have to do, you will need this)! (obviously use the one in your account, the one listed above won’t work for you)

I also set up a user account for the main IT email account at the office so that it has access to the Work project only. This way when or if I leave my current job, I can just hand off the login to the next person (or leave it with someone here) and they will be able to log in and access all of the scripts that are owned by the company, including being able to see all the changes I’ve made, and any comments I’ve made during the commit process.

TortiseSVN (subversion client)

So now that we have a repository, we need a subversion client. On Windows that leads us to TortiseSVN. There are others, and you are certainly welcome to use a different subversion client,  but TortiseSVN is the hands down leader of the pack for features and maturity. It’s also really easy to install and configure.

TortiseSVN is a command line interface to subversion, but it integrates with the Windows Shell. This means that there is no “program” window to access for settings and such, you access everything via context menus (right click).

Once you have it installed on a Windows computer, you’ll need to link it to your Repository. The easiest way I’ve found to do this is to use the TortiseSVN Repo-browser (you’ll want to get familiar with this tool anyway, as it is installed with TortiseSVN by default and you can use it to… well browse your repository).

Just right click on any file or folder, highlight the TortiseSVN entry, and select Repo-browser from the resulting menu:
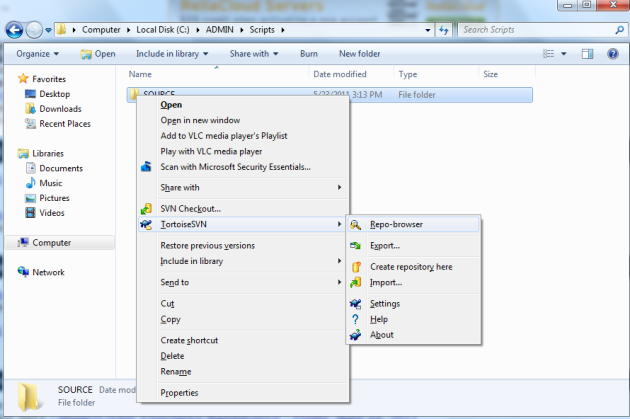
TortiseSVN context menu

In the Repo-browser window enter the URL for your subversion repository and click the OK button:

When the Repo-browser attempts to connect to your repository, it will ask you for a username and password, and if you want to store that credential in a file on your computer (that’s up to you):

Once you have entered the credentials, it will show you the contents of your repository:

Now TortiseSVN is ready to use! The Repo-browser interface is fully drag and drop, so you can just drop your script files and folders on the right pane, and it will upload them to subversion. You’ll need to enter a commit message, and once the upload completes, you have your first version of your files in subversion.

NotePad++ (text editor)

Now all we need is an editor that can make use of this, and we’re in luck. Perennial favorite NotePad++ has an extension for TortiseSVN. First, you’ll need to install NotePad++ (or open up the portable version on your USB drive). Once you have NotePad++ open, Select the Plugin Manager from the Plugins menu as shown here:

One of the reasons that I’ve been such a big fan of NotePad++ is it’s extensive selection of available plugins. In the Plugin Manager, just select the Tortise SVN plugin and click Install as shown in the image below.

This plugin requires two supporting plugins, which will automatically be selected for install, as shown here:

Once the installation is complete, NotePad++ will need to be restarted (it will tell you this and prompt you for the restart of the program). After NotePad++ is restarted, we are ready to start actually using our version control system!

If you’ve never used a VCS before, you’ll need to understand the concept of Working Sets and the Checkin/Checkout relationship. These topics are far outside the scope of this post, but if you are new to this, I’d really suggest reading the official Subversion documentation (or at least skimming it). You can find the official Subversion book here.

In order to work on any files stored in the repository, we first need to create a local copy of the repository, or a “Working Set”:

  1. Create a folder where you want to store your Working Set. You can name it anything but “svn”, as this name is reserved for use by TortiseSVN. I usually choose something like C:\SOURCE, so it’s easy to remember.
  2. Right click on the folder you just created and choose SVN Checkout from the context menu.

At this point, TortiseSVN is going to prompt you for some information about how you want the Working Set created, in the form of this window:
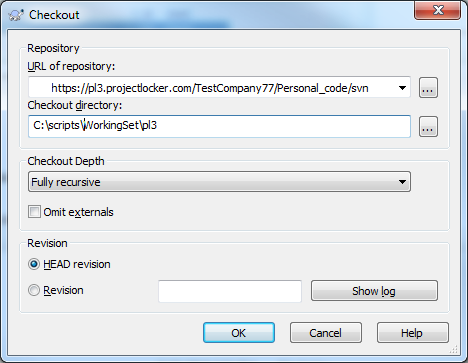
The only thing you really need to be concerned with here is the Revision section. You only want to change this if you don’t want the latest revision of the files in your repository (which is what HEAD revision means). If you need an earlier revision, select the Revision radio button, and then use the Show Log button at the right to search for the desired revision. If this is the first time you’ve set this up, or you want the latest revision, just click the OK button. After all the files from your repository are copied, you’re ready to start editing!

Up to this point, everything we’ve discussed has been pure configuration, something that you’ll do one time per computer, and that’s it.

Using the Version Control System

Here is an example of the typical workflow of editing a script without using a VCS:

  1. Find the script (this is usually the hardest part).
  2. Edit the script.
  3. Save the file.
  4. Pull your hair out because the 2500+ line script you just changed isn’t working right (hopefully you’ve never experienced this step).

Now here is an example of the typical workflow of editing a script using the VCS we just set up:

  1. Open the file you want to edit from the Working Set in NotePad++. For this example I’ll use the file C:\Admin\Scripts\SOURCE\Shell\reboot.cmd from my local Working Set.
  2. Make your changes in NotePad++, and save the file. If you do not save the file, there is nothing to commit to the repository.
  3. From the NotePad++ Plugins menu, select Tortise SVN > TSVN – File commit, as shown in this image:
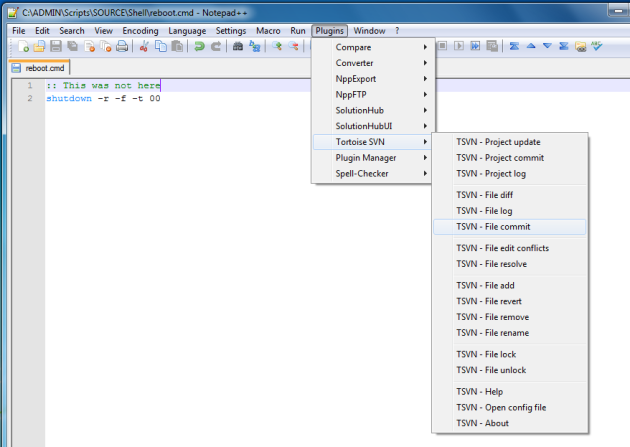
This tells TortiseSVN that you want to write the changes you’ve made to your repository, and it will prompt you to do so using the Commit window:
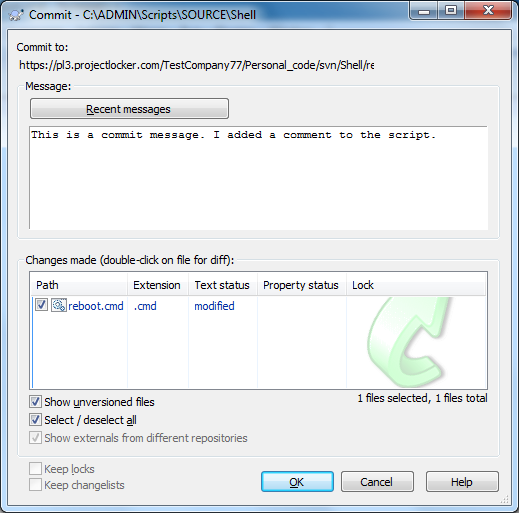
As you can see there are several options before you actually commit the file. In practice you’ll usually only need the Message area and the OK button. The Message area is basically a comment area for what these changes represent. The more verbose you are here, the easier it will be to understand the changes that were made in the revision, and it will also make it much easier to find a revision where a particular change was made. Once you click the OK button, TortiseSVN will commit your changes to the repository, as shown in this window:

Clearly you can see this is a slightly more complicated process, but the pay off totally worth it if something goes wrong.

How to figure out where you broke something after you’ve been using this for a while

The exact workflow that any given person uses will probably be slightly different than that used by any other person, so this is going to be a description of my particular workflow, and how I track things.

I’m writing a PowerShell Module (sshhh), and I have a function in it called Get-Sysinternals. When I first wrote this function, it would default to downloading all of the Sysinternals utilities. I’ve edited it and altered it several times since then, and I wanted the default behavior to be that it would only download updates to the tools if they were already installed on the local computer in a specific folder. I then later added some switches to change the default behavior, and somewhere along the line, I broke the default behavior.

To figure out what changed, I needed to see what the code looked like when the default behavior was changed. To do this I opened the file (AdminsArsenal.psm1) in NotePad++, and from the NotePad++ Plugins menu, I selected Tortise SVN > TSVN – File log.

This brings up a viewer for all of the Commit activity for the file, which looks something like this:

Scrolling through the commit messages, I find that at revision 76 I changed the default behavior.

What you’ll do at this point depends on how you want to handle this. You could right click the file in explorer, and select TortiseSVN > Update to revision…, if you just wanted to revert the file to a point where you know it worked. Personally I just wanted to see the code in revision 76, so I right clicked the revision I had highlighted, and selected Compare with working copy from the resulting context menu:

Now this particular example was not a great one to use, as I completely rearranged the functions in that module in a later revision so the compare is pretty sloppy, but you get the point.

You’ll also notice that in the Log Messages window, it shows the Author which makes it really easy to determine who made what changes to a given file if you have more than one person working on your scripts.

Kung Fu for SysAdmins: Use KeePass, Dropbox, and KeeFox for total password management.

I don’t know about you guys (and gals), but I manage a ton of passwords (if I printed them out I’d be looking at well over a metric ton). I have every account on the work domain, my personal network accounts, service accounts on each, equipment passwords, and don’t even get me started on website passwords. For the past 5 years or so I have been keeping them (religiously) in a KeePass 1.x database on my trusty USB drive, but when I’m actually sitting at my desk it’s kind of a pain having to remember to plug it in and fire up the (portableapps.com) menu before I can get to KeePass. Especially considering that I take the USB key with me every time I walk farther away than 10 feet from my computer.

So I cleared out an hour of my day (which is harder than it sounds) and went searching for a better solution. Really the only other viable solution I could find was lastpass. I just can’t bring myself to trust all of my passwords to a web service. They claim it’s secure, but how do I know? For all I know they could be collecting passwords for everything in a plan to overthrow the internet (hey it could happen!). In all seriousness, for my personal passwords I really don’t care, but I’m paid to (in large part) protect the security of our corporate network, not to just float the keys to the castle out on the first web service that comes along looking all hot.

So KeePass still wins out. But there has got to be a way to make it more useful. And I found it.

Quick interjection: I’m switching from KeePass v1.x to v2.x, but v2.x uses the DotNET Framework, so it’s not technically portable (as in take it anywhere on a USB drive, like KeePass v1.x). Don’t get me wrong, I love KeePass v1.x, but v2.x has so many useful features not available in v1.x!

So why switch? Because the people that maintain KeePass have made that kind of a non issue. KeePass v2.x fully supports import and export of v1.x files. So I can install KeePass 2.x on my workstations, and keep v1.x on my USB drive, and just export the v2.x file to a v1.x format daily (I don’t change passwords more often than that anyway – usually).

Still, syncing all those machines is kind of a headache, which is why I just use a USB drive (you see where this is going).

Enter DropBox (full disclosure: if you use that link to sign up for DropBox, I get 250MB of free storage on DropBox at no cost to me or you). If you’re working in IT and you are not using DropBox (or a similar service) shame on you! These kinds of services are really useful, and getting to be ubiquitous. Your users are going to start asking about them, and how you can leverage them to help them do their jobs better and/or easier. If nothing else, learn about them so that you can say “no” and be able to back it up with sound logic about security repercussions (or allow them and help the users get the most from them).

So I save my KeePass database files to my DropBox folder, and then just point all my KeePass installs to that folder (I use the same folder on every computer I use). I also save my KeePass 1.x files to a different folder in DropBox, so I can still use the KeePass Portable. DropBox also has a portable version for use on USB drives (but it requires DotNET Framework 3.5 be installed, so it’s not technically “portable”), if I wanted to I could do this instead.

Now this set up alone is totally awesome, but wait; there’s more!

One of the things I really like about lastpass is that it has a Firefox plugin. Unlike KeePass, which is pretty much IE only on the browser integration side. I don’t count KeeForm for Firefox because you have to install and configure the mozrepl extension for it to work, so that’s now two extensions that I have to maintain, and I’ve had some issues with KeeForm in Firefox too. When it was the only way it was cool on one workstation, but I work from 4-6 workstation on a regular basis. Just not my cup of tea.

Enter KeeFox. KeeFox is a Firefox extension that tightly integrates KeePass with Firefox. Word of warning: it is a beta extension, the developer has not declared it fit for public consumption (but as IT professionals, people reading this should not have any problems), though I’ve not had any issues with it (outside of the one I’m about to explain). KeeFox only works with KeePass v2.09 (or higher), Firefox v3.0.6 (or higher, I have it running on 3.6.3), on the Windows OS platform (works on 7, 7×64 and XP, I have not tested on anything else).

Simply install the latest version of KeePass 2.x and configure as above. Make sure that Firefox is at least v3.0.6 (should be on 3.6.3 by now anyway), and install KeeFox. Restart Firefox to complete the installation.

The one issue I’ve had; the Windows Firewall. It’s good, it works. That’s the problem. See to get KeeFox to integrate with Firefox, it has to communicate across TCP/IP. So you are going to need to make some firewall exemptions, maybe. I didn’t have any issues with Windows XP just working. But Windows 7 changed things with the Windows Firewall (most of the relevant changes actually took place in Vista, but I never used Vista). The Windows Firewall is now bidirectional. This means that it will block traffic that is not part of Windows going either direction (in XP it was only incoming traffic that was filtered).

When I set this up on my main workstation (Win7 x64) it didn’t work right out of the gate, I had to create a firewall exemption for the port that KeeFox uses (12535). But on a Windows 7 x86 workstation, it just worked (other users have reported that it works no problem on Win7 x64, go figure). So add a firewall exemption for port 12535 both inbound and outbound (the exemptions can be restricted to the local subnet only) if you are unable to get KeeFox to recognize that KeePass is running.

That’s it, you are now rocking what is probably the most versatile and secure password management solution ever. As a bonus, when you use KeeFox to save your login information for websites, it will automatically use the site’s favicon as the icon in KeePass (how cool is that?).

As an aside, if you have an iPhone (which I do) you might be interested in the MyKeePass app ($0.99). It is under active development, and supports reading keePass v2.x database files from DropBox accounts (editing is coming soon according to the developer, but I don’t really need the editing capability on my phone).

How to: View email Headers in Outlook 2010

Normally I hear my Users complaining about the changes in Microsoft Office, and my standard response is something along the lines of CRY MORE N00b!!!1!11!1!eleventyone! “Well it’s Microsoft, what are you gonna do?”. But today I am feeling their collective pain. See I installed the Office 2010 RTM on my personal workstation.

Is Microsoft trying to make life more difficult for SysAdmins? Specifically, why (for the love of whatever god you believe in) would they hide the button to view email headers? I need email headers. They give me information. Useful information. Like why my spam filter is marking legitimate email as spam (you know little things like that).

Just not in Outlook 2010. Or at least not where it used to be, or where you’d think it should be. See in Outlook 2003, or 2007 (and I’m pretty sure it was even this way in Outlook XP and 2000), you simply right-click the email, and select “Message Options…”, and you get to see header information. Easy, right?

Apparently there is some guy at Microsoft that thought this was too confusing (or maybe I don’t know,  too easy), and simply had to be changed in Outlook 2010. Ok, no problem, I’ll just bust out some Google Fu, and we’ll be off to the races.

10 minutes later, I find my self wanting to fly to Redmond to beat the tar out of that guy. I’ve found several forum posts, and blog entries that describe ways to do it that simply do not exist in the RTM version of Outlook 2010 (I defy you to open an email in the RTM version of Outlook 2010, and find a View tab in the ribbon). Finally I find one that works. Hopefully this saves you guys some trouble.

Method One (the long way):

  1. Open the email
  2. Click the File Tab
  3. Click the Properties button (?)

Ok, so at least now I know how to view it, but now I have to actually open the email I want the header information for, and this is just way too much work. I want this to be as easy as it was in previous versions of Outlook.

You’ll notice in this screen shot:

That I have a button for showing the “Message Options” (Header information) in the “Quick Access Toolbar” (wasn’t easy to get it there).

Method two (the easier way):

  • Click the Drop down arrow in the Quick Access Toolbar (“QAT” from here on), and select “More Commands”, as shown below.

  • Now follow along in the screen shot below: (1) select “All Commands” from this drop down, (2) find and select “Message Options…” , (3) click “Add”, Click “OK”.

  • Now you can view header information for any email without having to actually open the email, as shown below.

Hey Microsoft: QUIT SCREWING AROUND WITH THE OFFICE INTERFACE!!!

Things like this are why Apple products and Open Office are gaining so much ground on you. I understand updating the Office interface to the ribbon style menus (I don’t like it but I understand it). You should have done it all in 2007, or just waited until 2010 to do any of it.

Kung Fu for SysAdmins: Windows 7 made easy

Back when I was in IT trade school I was taught a really valuable lesson in how to make your life a bit easier as an administrator; one of my instructors walked up to my computer, unplugged my mouse, and said “now do what you were supposed to, just without the mouse.”

At the time I was like “what a dick”, but since then, I’ve really come to appreciate the lesson he was getting at: shit happens, and sometimes it is just faster to do it without a mouse.

So I keep hearing about how people making the transition directly from Windows XP to Windows 7 are going to have trouble (granted, the issues mentioned are minor) adjusting to some of the changes Microsoft has made to where settings are located. I would argue that only people who haven’t put in the effort to learn the correct way to access these settings are going to have issues.

Let me elaborate. One of the common complaints I hear from fellow administrators about Windows 7 is that the setting to change folder options is now more difficult to find. It’s been changed from Windows Explorer>Tools>Folder Options>View Tab, to Windows Explorer>Organize>Folder and Search Options. Sure you could pop open google and find instructions in relatively little time, or you could do it the correct way from the start (which works on all versions of Windows since XP): Run>Control Folders>View Tab (in XP).

This is not the only thing that can be accessed using Windows Control Commands either. See if like me, you have been using this method since Windows 2000 (or there abouts), this was never an issue (this particular setting actually changed in Vista, but many people have opted to skip Vista and go directly to Windows 7).

Here is a list of some of the things you can access in Windows without the mouse (type these at a Run Prompt):

  • control = Opens the Control Panel Window
  • control admintools = Opens the Administrative Tools
  • control keyboard = Opens the Keyboard Properties Window
  • control color = Opens the Display Properties (at the Appearance Tab in Windows 7)
  • control folders = Opens the Folder Options Window
  • control fonts = Opens the Font Policy Management Window
  • control international (or intl.cpl) = Opens Regional and Language Options
  • control mouse (or main.cpl) Opens mouse properties
  • control userpasswords = Opens the User Accounts Editor
  • control userpasswords2 (or netplwiz) = Opens User Account Access Restrictions
  • control printers = Opens the Printers and Faxes Window
  • control desktop (Windows Vista/7 only) = Opens Control Panel>Personalization
  • appwiz.cpl = Opens the Add or Remove Programs Utility
  • optionalfeatures = opens the Add or Remove Windows Component utility
  • desk.cpl = Opens the Display Properties (Themes Tab)
  • hdwwiz.cpl = Opens the Add Hardware Wizard
  • irprops.cpl = Opens the Infrared utility (does nothing if no IR devices are installed)
  • joy.cpl = Opens  Game Controller Settings
  • mmsys.cpl = Opens the Sound and Audio device properties window (Volume Tab)
  • sysdm.cpl = Opens the System Properties window
  • telephon.cpl = Opens the Phone and Modem options window
  • timedate.cpl = Opens the Date and Time Properties window
  • wscui.cpl = Opens the Windows Security Center in XP (opens the Action Center in Windows Vista/7)
  • access.cpl = Opens the Accessibility Options Window (does not work in Windows 7)
  • wuaucpl.cpl = Opens Automatic Updates
  • powercfg.cpl = Opens the Power Options Properties window
  • ncpa.cpl = Opens the Network Connections window
  • bthprops.cpl = Opens the Bluetooth Control window (does nothing if no bluetooth devices are installed)
  • certmgr.msc = Opens the Certificate Management MMC
  • compmgmt.msc = Opens the Computer Management
  • comexp.msc (or dcomcnfg) = Opens the Computer Services MMC
  • devmgmt.msc = Opens Device Manager
  • diskmgmt.msc = Opens Disk Management
  • eventvwr.msc (or eventvwr) = Opens the Event Viewer
  • fsmgmt.msc = Opens Shared Folders
  • napclcfg.msc = Opens the NAP client configuration tool
  • services.msc = Opens Service Manager
  • taskschd.msc (or control schedtasks) = Opens the Task Scheduler
  • gpedit.msc = Opens the Group Policy MMC
  • lusrmgr.msc = Opens Local Users and Groups
  • secpol.msc = Opens the Local Security Settings window
  • ciadv.msc = Opens the Indexing Service Window
  • ntmsmgr.msc = Opens the Removable Storage Manager
  • ntmsoprq.msc = Opens the Removable Storage Operator Requests
  • wmimgmt.msc = Opens the WMI (Windows Management Instrumentation) window
  • perfmon.msc (or perfmon) = Opens the Performance Monitor
  • mmc = Opens a blank Microsoft Management Console
  • mdsched = Opens the Memory Diagnostics tools
  • dxdiag = Opens DirectX diagnostics tools
  • odbcad32 = Opens the ODBC Data Source Administration window
  • regedit (or regedt32) = Opens the Registry Editor (these commands actually open different Registry editors, google for the differences)
  • drwtsn32 = Opens Dr. Watson
  • verifier = Opens the Driver Verification Manager
  • cliconfg = Opens the SQL Server Client Network Utility
  • utilman = Opens the Utility Manager (in Windows 7 this opens the Ease Of Access Center)
  • msconfig = Opens the System Configuration Utility
  • sysedit = Opens the System Configuration Editor
  • syskey = Opens the Windows Account Database Security Manager
  • explorer = Opens Windows Explorer
  • iexplorer = Opens Internet Explorer
  • wab = Opens the Windows Address Book
  • charmap = Opens the Character Map
  • write = Opens Wordpad

Now these are not the only things you can type at a run command to get results, but I find that those more than cover most activities you will likely need to do on a day to day basis.

I would say that I find myself using only 10-15 of those commands on any kind of a regular basis. You may only need 4-5 regularly, or none at all. Everyone does things differently, however I have found these commands to be the only thing that stays constant over several versions of the Windows OS. So for me, it takes the Least Amount Of Administrative Effort to simply use these commands.